Login to VPS with PuTTY – Simple step-by-step instructions
In the login and management of VPS, PuTTY is the most trusted software. So what’s interesting about this software? This article will give you the answer.
What do you know about PuTTY software?
Features of PuTTY
Currently, there is much software used to log in and manage VPS. Some software like PuTTY, Zoc Terminal, Termius, Bitvise, etc. However, when it comes to simple, fully functional, and commonly used software, it is hard to ignore PuTTY. Many people in the world trust this software.
PuTTY is an application of the SSH protocol developed on the Windows platform. This software is open-source, so it is free. Understandably, it is software used to control the server via the internet. It supports many network protocols, including SCP, SSH, Telnet, rlogin, etc.

PuTTY was originally written specifically for the Windows operating system. But now, it has been written for many other operating systems such as Unix, macOS, Symbian, Windows Mobile, and Android. PuTTY is not an abbreviation. Use to control VPS is its function. This software is very light, so it loads very quickly.
Advantages of using PuTTY
The most important advantages of this software are:
- It will provide certain features, especially when working remotely.
- Simple in configuration and more stable than other similar programs.
- As soon as the connection is in the process of being restored, the remote connection can resume. It means the file or text transfer can continue.
- Easy-to-use graphical user interface.
- Remote secure terminal configuration changes are supported.
- Some terminal control sequences, such as the Linux console sequence, are not supported by Xterm. But with PuTTY, it is supported.

Instructions for using PuTTY to log in to VPS
After getting a VPS, the first job you need to do is connect to the VPS to install the necessary applications. Download the software here. As mentioned above, this is very light software. So it will load very quickly. After successful download, proceeds with the installation. The installation process is so easy and fast. After successful installation, you log in to VPS with PuTTY according to the steps below.
Step 1. Start PuTTY
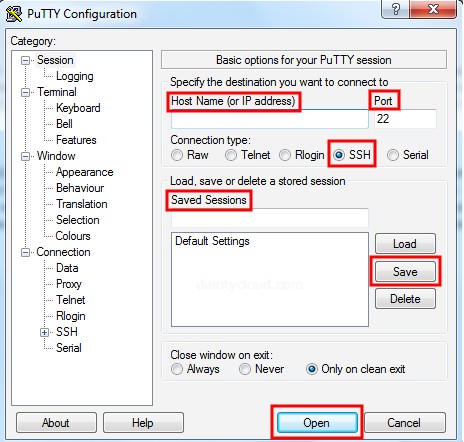
After running, the software interface will look like below:

Proceed to declare VPS information. Here, you will provide full parameters. These parameters include:
- In the Host Name (or the IP address) box, enter the server IP.
- Port to default 22 (port information depends on each server).
- Connection type to SSH.
- In the Saved Sessions box, enter a name to save the information for later. Then click Save. This way, you can save the IP address and port number of your VPS. Help you don’t have to enter them every time. Alternatively, if you have multiple servers, you can save a list of servers and connect to them each time you click on one of the lists. From now on, to connect to the server, double-click your server name in the Saved Sessions section.
Then click Open.
Step 2. Enter your VPS password
The new interface appears. Enter the root account and its password. The highest administrative right of VPS is root. When you enter the password, the password will not be displayed. So be careful. Here, you need to enter your correct and sufficient password. Then press Enter to be able to connect. Change the root user password the first time you log into the server.

If you enter the correct information, the interface will look like this:

Here you are successfully logged in. You can already start using and managing your VPS. Very simple, right? In addition to PuTTY, you can also refer to other software at the Top 5 most effective VPS management software today. Dainty Cloud is always willing to answer all your questions. As well as bring you the best VPS service quality.


